Filming a match Advantage can read.
One camera behind the back fence, raised, held still, recording the whole match. Set it up before the first serve and the file is ready to upload when you walk off court.
Put the camera behind the back fence
The court mapping reads the lines, so it needs the court from one end, high enough to see over the net. Raise the camera to head height or above, centre it on the court, and fix it there.
Behind the back fence
From one end of the court, never the side. Most PlaySight courts already film from there.
Raised and centred
Head height or above, in line with the centre mark, so both sidelines are in frame.
Fixed, never held
A tripod, or a phone clamped to the fence. Following the play breaks the analysis.
What the frame needs to show
- Every court line, both sidelines included
- The far service line, clear of the net
- The space behind the near baseline, where the player serves and returns
- Zooming or panning during a point
- A side view, or a second camera cut in
- Doubles — singles only for now
Audio isn’t used, so wind and court noise don’t matter.
Check your settings before you film
Find your camera below. Whatever you film on, you’re after 1080p or better at 30 fps or higher.
iPhone
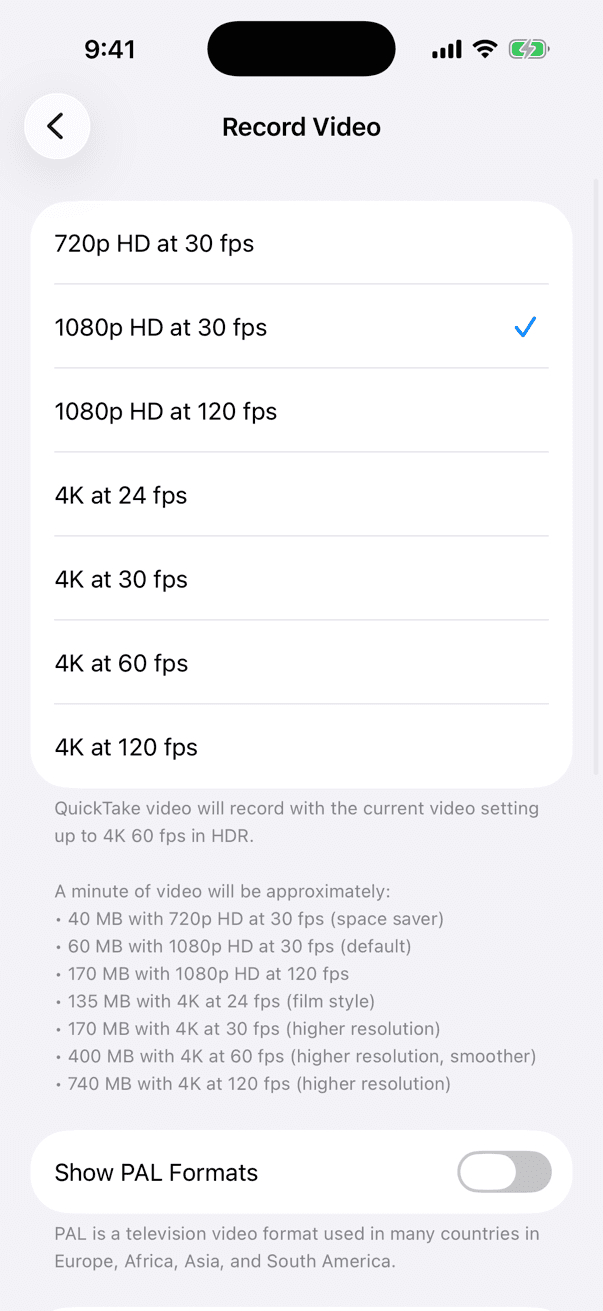
Open Settings → Camera → Record Video. Set it once and every match after is ready.
- 1
Choose 1080p HD at 30 fps
It’s the default. 60 fps follows fast exchanges better, where your iPhone lists it. 4K works too, but a long match is more likely to go over 8 GB.
- 2
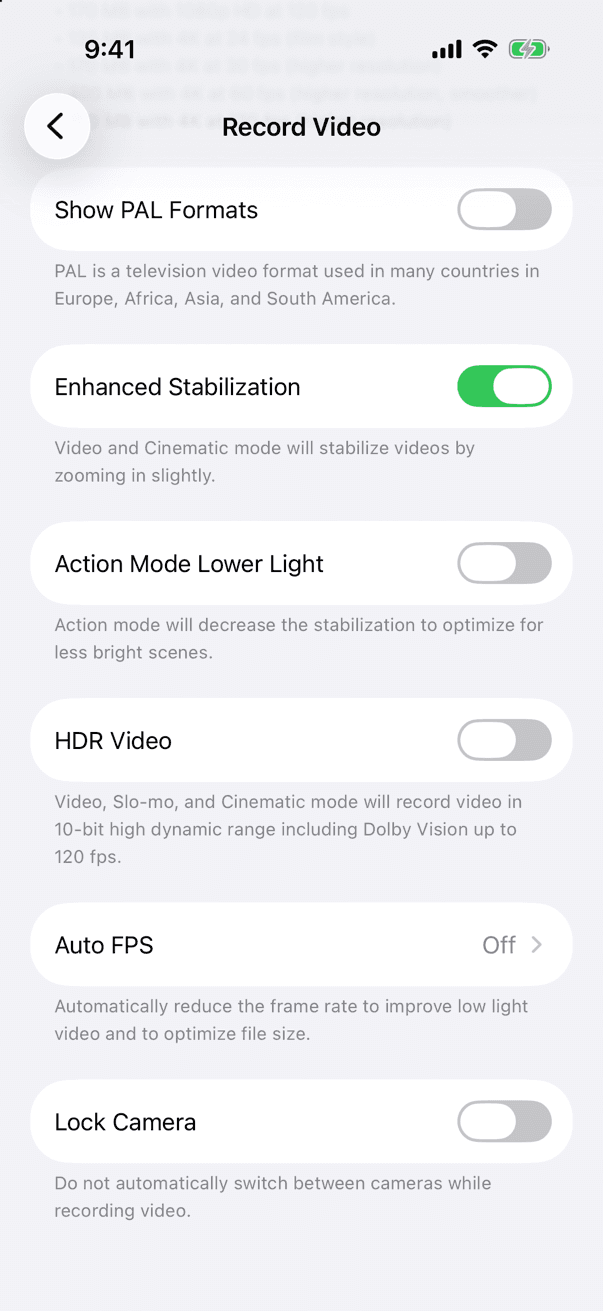
Turn off HDR Video
Further down Record Video. It’s on by default, and HDR colour can’t survive the conversion before upload, so the saved video looks paler and flatter than on your phone. The analysis isn’t affected.
- 3
Leave Auto FPS offSuggested
In low light it drops 30 fps video to 24, below what the analysis needs.
Leave Formats on High Efficiency. Most Compatible skips the conversion before upload, but it doubles the file, so a full match goes over 8 GB. The screens are from iOS 26; older versions word a few of these differently.
Android
Open the Camera app, switch to video and tap the settings gear. Set the video size or resolution to 1080p (sometimes labelled FHD) at 30 fps or higher, and turn off HDR video if your phone offers it. The exact wording varies by phone.
GoPro
- Resolution
- 1080
- Frame rate
- 30 or 60
- Lens
- LinearSuggested · keeps the court lines straight
PlaySight and court cameras
Pick the camera behind the baseline, not the side view; most PlaySight courts already film from there. There’s nothing to set on court. Hudl works the same way.
SwingVision
SwingVision records on your iPhone, so the iPhone settings above apply. Mount it the same way, behind the back fence and raised. Importing its stats needs no video at all; the export guide covers it.
During the match
Start before the first serve
Press record during the warm-up. You mark where the match starts when you upload, so a few extra minutes cost nothing; a missed first game can’t be got back.
Leave it running
Keep recording through changeovers and set breaks. The analysis reads the full sequence of points, and one file is one upload.
Check space and battery
At 1080p and 30 fps an iPhone uses about 60 MB a minute, so two hours needs around 7 GB free. A power bank on the fence covers a long match.
After the match
Stop recording after the last point. The file is ready as it is: don’t edit or compress it, and don’t send it to yourself in a messaging app, which shrinks it.
Next: get the file into Advantage
The export guide covers getting the original off the device, the size limit and what the uploader does for you.